发布订阅、观察者设计模式
观察者模式
观察者模式定义了对象间的一种一对多的依赖关系,当一个对象的状态发生改变时,所有依赖于它的对象都将得到通知,并自动更新
观察者模式属于行为型模式,行为型模式关注的是对象之间的通讯,观察者模式就是观察者和被观察者之间的通讯

实现代码如下:
被观察者模式
1
2
3
4
5
6
7
8
9
10
11
12
13
14
15
16
17
18
| class Subject {
constructor() {
this.observerList = [];
}
addObserver(observer) {
this.observerList.push(observer);
}
removeObserver(observer) {
const index = this.observerList.findIndex(o => o.name === observer.name);
this.observerList.splice(index, 1);
}
notifyObservers(message) {
const observers = this.observeList;
observers.forEach(observer => observer.notified(message));
}
}
|
观察者:
1
2
3
4
5
6
7
8
9
10
11
12
13
| class Observer {
constructor(name, subject) {
this.name = name;
if (subject) {
subject.addObserver(this);
}
}
notified(message) {
console.log(this.name, 'got message', message);
}
}
|
使用代码如下:
1
2
3
4
5
6
7
| const subject = new Subject();
const observerA = new Observer('observerA', subject);
const observerB = new Observer('observerB');
subject.addObserver(observerB);
subject.notifyObservers('Hello from subject');
subject.removeObserver(observerA);
subject.notifyObservers('Hello again');
|
上述代码中,观察者主动申请加入被观察者的列表,被观察者主动将观察者加入列表
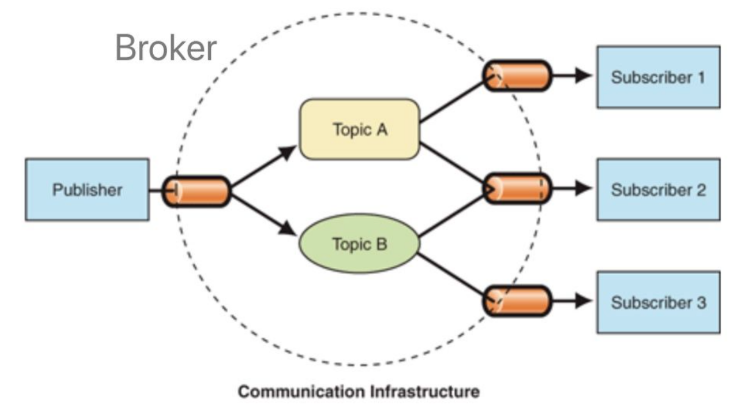
发布订阅模式
发布-订阅是一种消息范式,消息的发送者(称为发布者)不会将消息直接发送给特定的接收者(称为订阅者)。而是将发布的消息分为不同的类别,无需了解哪些订阅者(如果有的话)可能存在
同样的,订阅者可以表达对一个或多个类别的兴趣,只接收感兴趣的消息,无需了解哪些发布者存在
实现代码如下:
1
2
3
4
5
6
7
8
9
10
11
12
13
14
15
16
17
18
19
20
21
22
23
24
25
26
27
28
| class PubSub {
constructor() {
this.messages = {};
this.listeners = {};
}
publish(type, content) {
const existContent = this.messages[type];
if (!existContent) {
this.messages[type] = [];
}
this.messages[type].push(content);
}
subscribe(type, cb) {
const existListener = this.listeners[type];
if (!existListener) {
this.listeners[type] = [];
}
this.listeners[type].push(cb);
}
notify(type) {
const messages = this.messages[type];
const subscribers = this.listeners[type] || [];
subscribers.forEach((cb, index) => cb(messages[index]));
}
}
|
发布者代码如下:
1
2
3
4
5
6
7
8
9
| class Publisher {
constructor(name, context) {
this.name = name;
this.context = context;
}
publish(type, content) {
this.context.publish(type, content);
}
}
|
订阅者代码如下:
1
2
3
4
5
6
7
8
9
| class Subscriber {
constructor(name, context) {
this.name = name;
this.context = context;
}
subscribe(type, cb) {
this.context.subscribe(type, cb);
}
}
|
使用代码如下:
1
2
3
4
5
6
7
8
9
10
11
12
13
14
15
16
17
18
19
20
21
22
23
24
25
26
27
28
29
30
| const TYPE_A = 'music';
const TYPE_B = 'movie';
const TYPE_C = 'novel';
const pubsub = new PubSub();
const publisherA = new Publisher('publisherA', pubsub);
publisherA.publish(TYPE_A, 'we are young');
publisherA.publish(TYPE_B, 'the silicon valley');
const publisherB = new Publisher('publisherB', pubsub);
publisherB.publish(TYPE_A, 'stronger');
const publisherC = new Publisher('publisherC', pubsub);
publisherC.publish(TYPE_C, 'a brief history of time');
const subscriberA = new Subscriber('subscriberA', pubsub);
subscriberA.subscribe(TYPE_A, res => {
console.log('subscriberA received', res)
});
const subscriberB = new Subscriber('subscriberB', pubsub);
subscriberB.subscribe(TYPE_C, res => {
console.log('subscriberB received', res)
});
const subscriberC = new Subscriber('subscriberC', pubsub);
subscriberC.subscribe(TYPE_B, res => {
console.log('subscriberC received', res)
});
pubsub.notify(TYPE_A);
pubsub.notify(TYPE_B);
pubsub.notify(TYPE_C);
|
上述代码,发布者和订阅者需要通过发布订阅中心进行关联,发布者的发布动作和订阅者的订阅动作相互独立,无需关注对方,消息派发由发布订阅中心负责
区别
- 在观察者模式中,观察者是知道Subject的,Subject一直保持对观察者进行记录。然而,在发布订阅模式中,发布者和订阅者不知道对方的存在。它们只有通过消息代理进行通信。
- 在发布订阅模式中,组件是松散耦合的,正好和观察者模式相反。
- 观察者模式大多数时候是同步的,比如当事件触发,Subject就会去调用观察者的方法。而发布-订阅模式大多数时候是异步的(使用消息队列)
vue2的响应式原理
双向绑定的构成
双向绑定由三个重要部分构成
- 数据层(Model):应用的数据及业务逻辑
- 视图层(View):应用的展示效果,各类UI组件
- 业务逻辑层(ViewModel):框架封装的核心,它负责将数据与视图关联起来
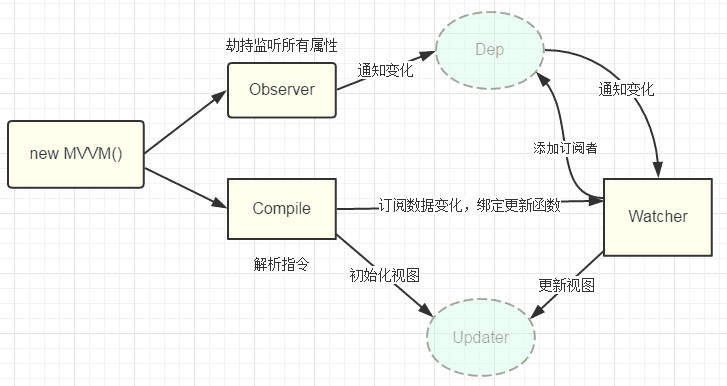
理解ViewModel
它的主要职责就是:
当然,它还有两个主要部分组成
- 监听器(Observer):对所有数据的属性进行监听
- 解析器(Compiler):对每个元素节点的指令进行扫描跟解析,根据指令模板替换数据,以及绑定相应的更新函数
双向绑定流程
1. 初始化阶段
- 响应式属性的创建:通过
observe 函数和 Observer 类,Vue 将组件的 data 对象转换成响应式对象。对每个属性,通过 Object.defineProperty 设置其 getter 和 setter,以便进行依赖收集和派发更新。
Dep** 实例的创建**:在响应式属性的 getter 和 setter 中闭包的 Dep 实例负责收集当前属性的所有依赖(即观察者,也就是 Watcher 实例)。
2. 组件渲染和依赖收集
Watcher** 实例的创建**:当组件渲染(或计算属性被访问,或侦听器被初始化)时,Vue 创建一个 Watcher 实例。这个实例负责评估表达式或渲染函数,并收集依赖(即被访问的响应式属性)。- 依赖收集过程:在
Watcher 的构造过程中,Dep.target 被临时设置为当前的 Watcher。然后,当访问任何响应式属性的 getter 时,这个属性的 Dep 实例会调用 addDep 方法将当前的 Dep.target(也就是这个 Watcher)添加到它的依赖列表中。这样,每个被访问的响应式属性都会收集到当前的 Watcher 作为它的依赖。
3. 更新过程
- 当响应式属性的值发生变化(触发 setter)时,属性对应的
Dep 实例会通知它的所有依赖(即收集到的所有 Watcher 实例),调用它们的 update 方法来响应数据变化。
Watcher 的 update 方法最终会导致组件的重新渲染,或者计算属性/侦听器的重新评估。
1
2
3
4
5
6
7
8
9
10
11
12
13
14
15
16
17
18
19
20
21
22
23
24
25
26
27
28
29
30
31
32
33
34
35
36
37
38
39
40
41
42
43
44
45
46
47
48
49
50
51
52
53
54
55
56
57
58
59
60
61
62
63
64
65
66
67
68
69
70
71
72
73
74
75
76
77
78
79
80
81
82
83
84
85
86
87
88
89
90
91
92
93
94
95
96
97
98
99
100
101
102
103
104
105
106
| class Vue {
constructor(options) {
this.$options = options;
this.$data = options.data;
observe(this.$data);
proxy(this);
new Compile(options.el, this);
}
}
function observe(obj) {
if (typeof obj !== "object" || obj == null) {
return;
}
new Observer(obj);
}
class Observer {
constructor(value) {
this.value = value;
this.walk(value);
}
walk(obj) {
Object.keys(obj).forEach((key) => {
defineReactive(obj, key, obj[key]);
});
}
}
class Compile {
constructor(el, vm) {
this.$vm = vm;
this.$el = document.querySelector(el);
if (this.$el) {
this.compile(this.$el);
}
}
compile(el) {
const childNodes = el.childNodes;
Array.from(childNodes).forEach((node) => {
if (this.isElement(node)) {
console.log("编译元素" + node.nodeName);
} else if (this.isInterpolation(node)) {
console.log("编译插值⽂本" + node.textContent);
}
if (node.childNodes && node.childNodes.length > 0) {
this.compile(node);
}
});
}
isElement(node) {
return node.nodeType == 1;
}
isInterpolation(node) {
return node.nodeType == 3 && /\{\{(.*)\}\}/.test(node.textContent);
}
}
class Watcher {
constructor(vm, key, updater) {
this.vm = vm
this.key = key
this.updaterFn = updater
Dep.target = this
vm[key]
Dep.target = null
}
update() {
this.updaterFn.call(this.vm, this.vm[this.key])
}
}
class Dep {
constructor() {
this.deps = [];
}
addDep(dep) {
this.deps.push(dep);
}
notify() {
this.deps.forEach((dep) => dep.update());
}
}
function defineReactive(obj, key, val) {
this.observe(val);
const dep = new Dep();
Object.defineProperty(obj, key, {
get() {
Dep.target && dep.addDep(Dep.target);
return val;
},
set(newVal) {
if (newVal === val) return;
dep.notify();
},
});
}
|
依赖收集实现思路:
defineReactive时为每⼀个key创建⼀个Dep实例- 初始化视图时读取某个
key,例如name1,创建⼀个watcher1
- 由于触发
name1的getter方法,便将watcher1添加到name1对应的Dep中
- 当
name1更新,setter触发时,便可通过对应Dep通知其管理所有Watcher更新
从上面的实现可以看出来,vue2的基于Object.defineProperty实现的get和set方法存在一定的缺陷:
- 检测不到对象属性的添加和删除
- 数组API方法无法监听到
- 需要对每个属性进行遍历监听,如果嵌套对象,需要深层监听,造成性能问题
vue3的响应式原理
Proxy的监听是针对一个对象的,那么对这个对象的所有操作会进入监听操作,这就完全可以代理所有属性了
在ES6中,我们详细讲解过Proxy的使用,就不再述说了
下面通过代码进行展示:
定义一个响应式方法reactive
1
2
3
4
5
6
7
8
9
10
11
12
13
14
15
16
17
18
19
20
21
22
23
24
| function reactive(obj) {
if (typeof obj !== 'object' && obj != null) {
return obj
}
const observed = new Proxy(obj, {
get(target, key, receiver) {
const res = Reflect.get(target, key, receiver)
console.log(`获取${key}:${res}`)
return res
},
set(target, key, value, receiver) {
const res = Reflect.set(target, key, value, receiver)
console.log(`设置${key}:${value}`)
return res
},
deleteProperty(target, key) {
const res = Reflect.deleteProperty(target, key)
console.log(`删除${key}:${res}`)
return res
}
})
return observed
}
|
测试一下简单数据的操作,发现都能劫持
1
2
3
4
5
6
7
8
9
10
11
12
| const state = reactive({
foo: 'foo'
})
state.foo
state.foo = 'fooooooo'
state.dong = 'dong'
delete state.dong
|
再测试嵌套对象情况,这时候发现就不那么 OK
1
2
3
4
5
6
| const state = reactive({
bar: { a: 1 }
})
state.bar.a = 10
|
如果要解决,需要在get之上再进行一层代理
1
2
3
4
5
6
7
8
9
10
11
12
13
| function reactive(obj) {
if (typeof obj !== 'object' && obj != null) {
return obj
}
const observed = new Proxy(obj, {
get(target, key, receiver) {
const res = Reflect.get(target, key, receiver)
console.log(`获取${key}:${res}`)
return isObject(res) ? reactive(res) : res
},
return observed
}
|
- 为什么用 Reflect.get() 和 Reflect.set(),而不是直接用 target[key]?
根据 MDN 介绍 set() 要返回一个布尔值,比如 Reflect.set() 会返回一个是否修改成功的布尔值,直接赋值 target[key] = newValue,而不返回 true 就会报错。而且不管 Proxy 怎么修改默认行为,都可以通过 Reflect 获取默认行为。get() 同理。
vue3 的响应式核心原理即是通过 Proxy 代理目标对象的存取器,拦截存取操作,在执行收集依赖 track 以及触发更新 trigger 的方法后再完成原先的存取操作。
vue3.0 建立响应式的方法有两种: 第一个就是运用composition-api中的reactive直接构建响应式,composition-api的出现我们可以在.vue文件中,直接用setup()函数来处理之前的大部分逻辑,也就是说我们没有必要在 export default{ } 中在声明生命周期 , data(){} 函数,watch{} , computed{} 等 ,取而代之的是我们在setup函数中,用vue3.0 reactive watch 生命周期api来到达同样的效果,这样就像react-hooks一样提升代码的复用率,逻辑性更强。
第二个就是用传统的 data(){ return{} } 形式 ,vue3.0没有放弃对vue2.0写法的支持,而是对vue2.0的写法是完全兼容的,提供了applyOptions 来处理options形式的vue组件。但是options里面的data , watch , computed等处理逻辑,还是用了composition-api中的API对应处理。
composition-api reactive
Reactive 相当于当前的 Vue.observable () API,经过reactive处理后的函数能变成响应式的数据,类似于option api里面的vue处理data函数的返回值。
我们用一个todoList的demo试着尝尝鲜。
1
2
3
4
5
6
7
8
9
10
11
12
13
14
15
16
17
18
19
20
21
22
23
24
25
26
27
28
29
30
31
32
33
34
35
36
37
38
39
40
41
42
43
44
45
46
47
48
49
50
51
|
const { reactive , onMounted } = Vue
setup(){
const state = reactive({
count:0,
todoList:[]
})
onMounted(() => {
console.log('mounted')
})
function add(){
state.count++
}
function del(){
state.count--
}
function addTodo(id,title,content){
state.todoList.push({
id,
title,
content,
done:false
})
}
function complete(id){
for(let i = 0; i< state.todoList.length; i++){
const currentTodo = state.todoList[i]
if(id === currentTodo.id){
state.todoList[i] = {
...currentTodo,
done:true
}
break
}
}
}
return {
state,
add,
del,
addTodo,
complete
}
}
|
options data
options形式的和vue2.0并没有什么区别
1
2
3
4
5
6
7
8
9
10
11
12
13
14
15
16
17
18
19
20
21
22
23
24
25
26
27
28
29
30
31
32
33
34
35
36
37
38
39
40
41
| export default {
data(){
return{
count:0,
todoList:[]
}
},
mounted(){
console.log('mounted')
}
methods:{
add(){
this.count++
},
del(){
this.count--
},
addTodo(id,title,content){
this.todoList.push({
id,
title,
content,
done:false
})
},
complete(id){
for(let i = 0; i< this.todoList.length; i++){
const currentTodo = this.todoList[i]
if(id === currentTodo.id){
this.todoList[i] = {
...currentTodo,
done:true
}
break
}
}
}
}
}
|
不同类型的Reactive
vue3.0可以根据业务需求引进不同的API方法。这里需要
① reactive
建立响应式reactive,返回proxy对象,这个reactive可以深层次递归,也就是如果发现展开的属性值是引用类型的而且被引用,还会用reactive递归处理。而且属性是可以被修改的。
② shallowReactive
建立响应式shallowReactive,返回proxy对象。和reactive的区别是只建立一层的响应式,也就是说如果发现展开属性是引用类型也不会递归。
③ readonly
返回的proxy处理的对象,可以展开递归处理,但是属性是只读的,不能修改。可以做props传递给子组件使用。
④ shallowReadonly
返回经过处理的proxy对象,但是建立响应式属性是只读的,不展开引用也不递归转换,可以这用于为有状态组件创建props代理对象。
储存对象与proxy
上文中我们提及到,用Reactive处理过并返回的对象是一个proxy对象。
假设存在很多组件,或者在一个组件中被多次reactive,就会有很多对proxy对象和它代理的原对象。为了能把proxy对象和原对象建立关系,vue3.0采用了WeakMap去储存这些对象关系。WeakMaps 保持了对键名所引用的对象的弱引用,即垃圾回收机制不将该引用考虑在内。只要所引用的对象的其他引用都被清除,垃圾回收机制就会释放该对象所占用的内存。也就是说,一旦不再需要,WeakMap 里面的键名对象和所对应的键值对会自动消失,不用手动删除引用。
1
2
3
4
5
| const rawToReactive = new WeakMap<any, any>()
const reactiveToRaw = new WeakMap<any, any>()
const rawToReadonly = new WeakMap<any, any>()
const readonlyToRaw = new WeakMap<any, any>()
|